![Modulr_Logo_Black_LightOrange-1.png]](https://knowledge.modulrfinance.com/hs-fs/hubfs/Modulr_Logo_Black_LightOrange-1.png?height=40&name=Modulr_Logo_Black_LightOrange-1.png)
We're rolling out our Sage Intacct integration to early test users – If you're interested in using Sage Intacct with Modulr AP, contact us at support@modulrfinance.com
Who can connect Sage Intacct and sync the data?
Any administrator can connect Sage Intacct to Modulr AP – you'll need credentials to sign in to a Sage Intacct account.
How do I get started?
First, you need to set up a few things in Sage Intacct itself:
Create a web services user
Creating a user gives us a specific user to talk with your Sage Intacct account.
- Go to Company → Admin tab → Web Service Users
- Select 'Create' in the top right
- Complete the following fields in the User Details section
- User ID (tip: name the user ID something like 'modulr_ap_user') - We will reference this later and it should not change
- Email address
- Create a contact – Select the Contact name field and then select 'Add' from inside the dropdown
- Set a First name and Last name
- Click 'Save'
- In the Sage Intacct Financials Permissions box, for User Type, select 'Business' and for Admin Priviledges select 'Limited'
- In the Role table at the bottom, select the field and then 'Add' from inside the dropdown list.
- Enter a name of 'Modulr AP API'
- Click 'Save'
- Click 'Save' on the main Web Services User page to finish this step.
- Click 'Create' on the confirmation pop up – you'll need to enter your Sage Intacct password. NOTE: Setting up a Web Services User will use an additional user seat in your plan.
Set permissions for user
This makes sure Sage Intacct has the correct privileges to work with Modulr AP.
- Go to Company → Admin tab → Roles
- Find the role you created (e.g. 'Modulr AP API') in the table (you can use search) and select the pencil icon to edit
- Select 'View Subscriptions'
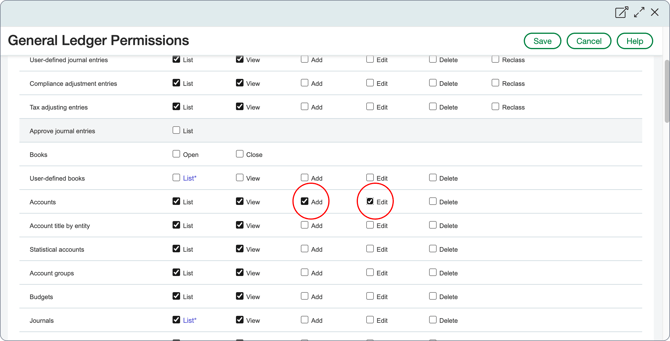
- Select a section (e.g. 'General Ledger' below) checkbox, then 'Permissions' on its row – in the list, select the necessary permissions using the table below as a guide.
- Repeat this for each of the sections in the table below. Tip: In most cases, you can select the 'Read Only' radio button at the top, which will select some items, then you can select any others that are needed outlined
- Select 'Save' on the Role Permissions page then select 'Save' on the Roles Information screen (goes back to User Roles list page) to finish.
General Ledger example:
Select 'Read Only' – some checkboxes will become ticked…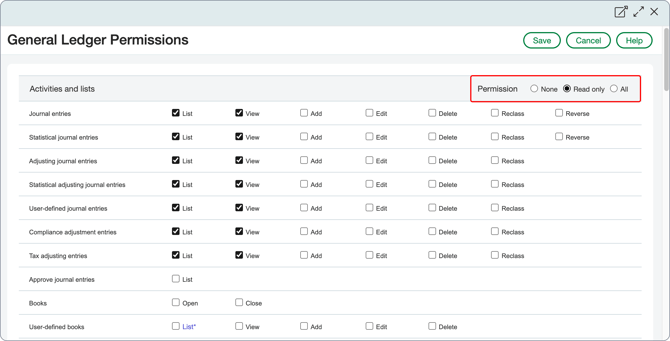
… then select additional checkboxes following the table as a guide:
|
Module (subscription) |
Panel |
Permissions |
|---|---|---|
|
Company |
--- |
Read Only |
|
Cash Management |
--- |
Read Only |
|
Reconcile Bank |
List, View, Add, Edit, Delete, Reconcile |
|
|
Bank Transaction for API |
List, View, Add, Delete |
|
|
Current Accounts |
List, View, Add, Edit |
|
|
General Ledger |
--- |
Read Only |
|
Accounts |
List, View, Add, Edit |
|
|
Accounts Payable |
--- |
Read Only |
|
Pay AP Purchase Invoices |
Run |
|
|
AP Purchase Invoices |
List, View, Add, Edit, Post, Reverse, Reclass |
|
|
AP Purchase Invoices |
List, View, Add, Edit, Post, Reverse, Reclass |
|
|
Adjustments |
List, View, Add, Edit, Post, Reverse, Reclass |
|
|
Payment Requests |
List, View, Edit, Delete |
|
|
Posted Payments |
List, View, Void |
|
|
Tax Detail |
List, View, Add |
|
|
Tax Schedule |
List, View |
|
|
Accounts Receivable |
--- |
Read Only |
|
Order Entry |
--- |
Read Only |
|
Contract Dimension |
List, Read |
|
|
Fixed Assets Management |
--- |
Read Only |
|
Inventory Control |
--- |
Read Only |
Enable API access to Sage Intacct
This allows Modulr to connect to Sage Intacct.
-
Go to Company → Admin tab → Subscriptions
- Find the Sage Cloud Services box and turn the toggle on
- Go down to Web services at the bottom and turn the toggle on
- Select 'Done'
- Log into Modulr AP and go to Company → Integrations
- Click 'Connect' and select and click 'Sage Intacct'
- Click continue until you are provided the 'Sender ID' and 'Client ID'. We will use these in the next step
- Go to Company → Set up tab → Company
- Select 'Edit' then select the 'Security' tab, then at bottom select web service authorisations
- Select 'Add'
- Enter 'Sender ID' found in Modulr AP
- Enter 'Client ID' also found in Modulr AP
- Enter 'Web Service User ID' (that you created earlier)
- Select 'Save', then 'Save' again on the next page
- Go to Company → Setup tab → Company
- Find your 'Company ID' at the top of the page, we will use this at the next step
Give Modulr access to Sage Intacct
Finally, we can continue our connection in Modulr AP.
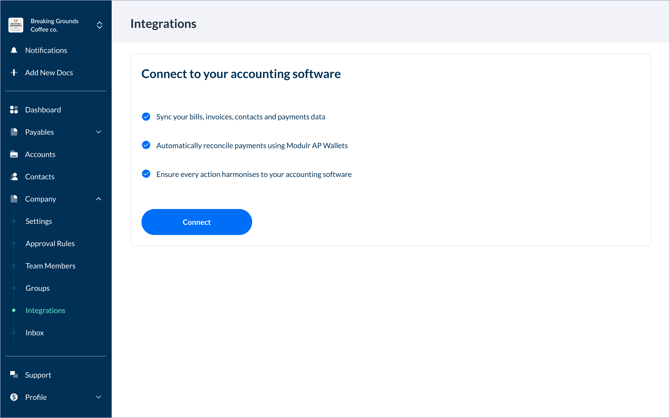
- Log into Modulr AP and go to Company → Integrations (or continue if you already have this page open)
- Click 'Connect' and select and click 'Sage Intacct'
- In the side panel that opens, follow the instructions shown until you are prompted with a form to fill
- Enter 'Company ID' (find the steps to get this in the previous section)
- Enter 'Web services User ID' using the Web services user ID created earlier
- Submit the form.
- Select your Sage Intacct entity from the list shown then select 'Connect'; Sage Intacct will begin syncing
